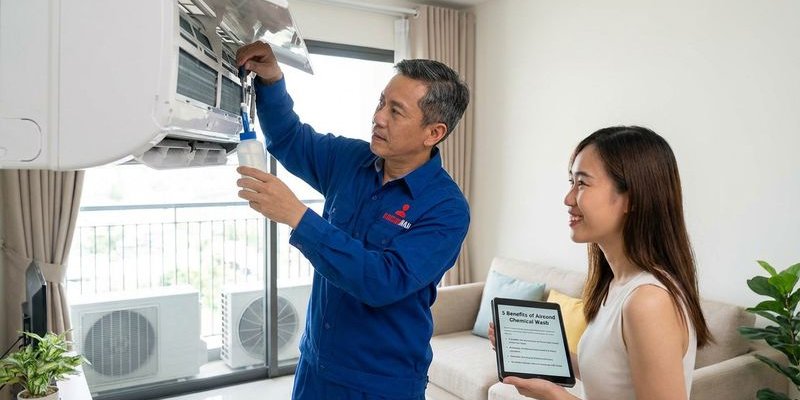
Living in Malaysia means your air conditioner likely runs non-stop to combat the tropical heat. A chemical overhaul—often called a “Spa for Aircon”—resets this hardworking system to factory-level cleanliness. Unlike a standard service, this process removes the unit from your wall to clean every internal component thoroughly.
Overview
Duration: 2-3 hours per unit Typical Cost (Malaysia): RM 150 - RM 250 (for 1.0HP - 1.5HP wall units) What it involves: We completely dismantle the indoor unit, soak all components in a chemical solution, and perform a full recommissioning.
The Complete Process
Phase 1: Preparation (15-20 minutes)
Step 1: Safety First Safety begins with isolating the power source to prevent electrical hazards.
- Turn off aircond: We switch off the unit via the remote.
- Isolate power: We locate and switch off the electrical isolator (usually a white switch near the unit) or the main distribution board (DB).
- verify disconnection: A voltage pen is often used to confirm no current is flowing.
- Protect the area: We lay down waterproof canvas sheets or “drop cloths” to protect your flooring and furniture from water splashes.
Step 2: Refrigerant Pump Down This technical step saves you money by preserving your existing gas.
- Technician runs the unit: The system must run in cooling mode to circulate the gas.
- Closes liquid line: We shut the valve at the outdoor unit to stop gas from leaving the compressor.
- Compressor action: The compressor pumps all refrigerant (R32 or R410A) back into the outdoor unit storage.
- Closes suction line: Once the gauge hits zero, we seal the system.
Insider Tip: Replacing a full tank of R32 gas in Malaysia can cost upwards of RM 180. A proper pump down ensures you don’t pay for gas you already own.
Phase 2: Dismantling (20-30 minutes)
Step 3: Disconnect Indoor Unit With the gas safely stored outdoors, the indoor unit is ready for removal.
- Disconnect pipes: We detach the copper liquid and suction lines.
- Disconnect wiring: Live, neutral, and earth wires are carefully unhooked from the terminal block.
- Remove drainage: The water discharge pipe is disconnected.
- Dismount: The entire indoor unit is lifted off the wall bracket.
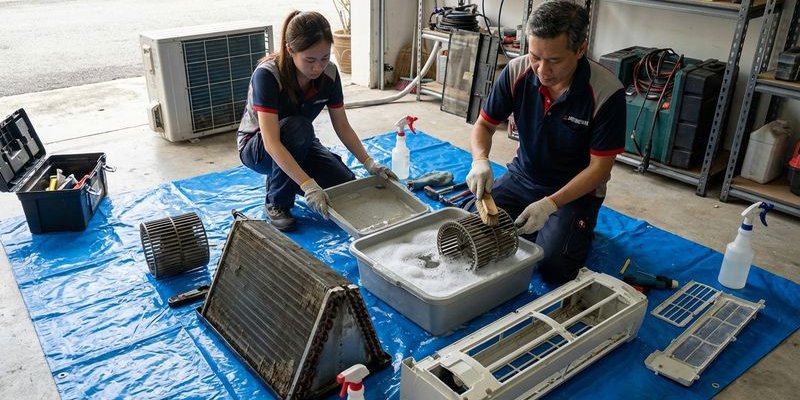
Step 4: Full Disassembly We break the indoor unit down into its individual parts for deep cleaning.
- Front panel and filters: Removed for surface cleaning.
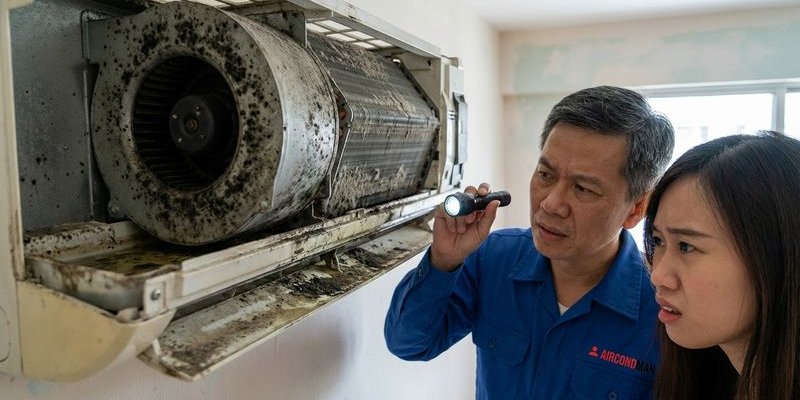
- Evaporator coil: This metal “radiator” is removed from the plastic chassis.
- Blower wheel: The cylindrical fan is extracted (often heavily coated in dust).
- Drainage pan: The tray that catches condensation is removed.
- PCB/Electrical: The circuit board is detached and set aside in a dry, safe zone.
Separation Checklist:
| For Chemical Soak | Set Aside (No Chemical) |
|---|---|
| Evaporator coil (The Cooling Fin) | Fan motor |
| Blower wheel (The Fan) | PCB/Circuit board |
| Drainage pan | Electrical wiring |
| Plastic chassis | Remote sensor |
| Air deflectors | Capacitors |
Phase 3: Chemical Cleaning (30-45 minutes)
Step 5: Chemical Soak We use specific chemical solutions to dissolve stubborn grime without damaging your unit.
- Alkaline Cleaners: We typically use an alkaline-based coil cleaner (like SC-Plus or similar) rather than harsh acids. Alkaline is safer for the “blue fin” coating found on brands like Daikin and Panasonic.
- Action: The solution breaks down organic matter, jelly-like slime, and mold.
- Soak time: 15-30 minutes allows the chemical to penetrate deep between the fins.
Step 6: High-Pressure Wash A thorough rinse is critical to prevent chemical corrosion.
- High-pressure jet: We use tools like a Karcher pump to blast away the dissolved debris.
- Fin protection: The water jet is aimed straight (not at an angle) to avoid bending the delicate aluminum fins.
- Clear water rule: We continue rinsing until the water runs completely clear, ensuring no chemical residue remains.
Step 7: Drying Moisture is the enemy of mold, so we ensure the unit is bone dry.
- Air drying: Large components are left to drip dry.
- Cloth wipe: Technicians use microfiber cloths to remove surface water.
- Compressed air: A blower forces trapped water out of tight corners and screw holes.
Phase 4: Reassembly (20-30 minutes)
Step 8: Rebuild the Unit We reassemble the components with precision.
- Drainage pan installed: We check the clip alignment to prevent future leaks.
- Blower wheel and motor: The fan shaft is greased before insertion for smooth rotation.
- Evaporator coil: Positioned carefully back into the chassis.
- Fan housing: Snapped shut to secure the internals.
- Electricals: The PCB is re-seated and wires are tidied.
- Final covers: Front panel and filters are snapped back into place.
Step 9: Reinstall on Wall The unit goes back to its original position.
- Mounting: The unit is hooked securely onto the wall plate.
- Piping connection: We reconnect the copper pipes, often re-flaring the tips to ensure a gas-tight seal.
- Drainage check: We pour water into the pan to test the flow before finishing up. This confirms the slope is correct.
Phase 5: Recommissioning (15-20 minutes)
Step 10: Vacuum the System This is the most critical technical step for long-term reliability.
- The Tool: We attach a vacuum pump to the service port.
- The Goal: To remove all air and moisture from the pipes.
- Why it matters: Moisture inside the pipes mixes with refrigerant to create acid, which kills compressors. A proper vacuum prevents this.
Step 11: Release Refrigerant With the system vacuumed, we reopen the valves.
- Valves open: The Allen key is used to release the gas stored in the outdoor unit.
- Flow check: You can often hear the refrigerant rushing back into the indoor unit.
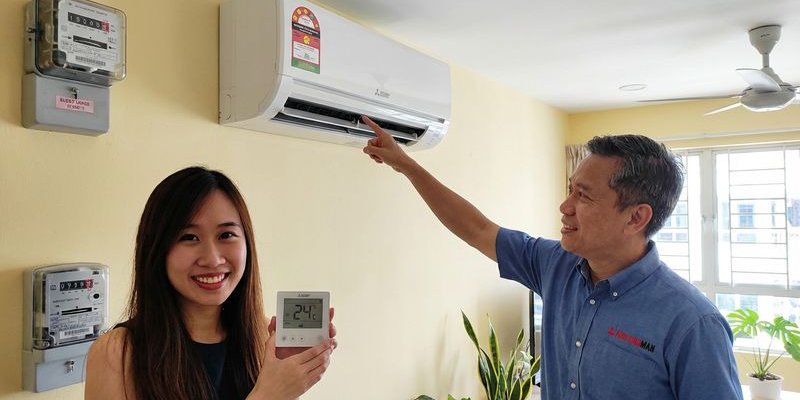
Step 12: Pressure & Function Test We verify the system is running at peak efficiency.
- Gauge check: We confirm the operating pressure (e.g., 120-150 psi for R410A).
- Amp draw: We may check the electrical current to ensure the compressor isn’t overworking.
- Cooling test: We measure the temperature difference between the air intake and the cold air output (supply air).
Before & After Comparison
| Component | Before | After |
|---|---|---|
| Evaporator coil | Grey/Black, airflow blocked by dust | Silver/Blue, clear gaps for air |
| Blower wheel | Caked with heavy dust, unbalanced | Clean blades, silent spinning |
| Drainage pan | Filled with “jelly” slime, risk of leak | Spotless, clear flow channels |
| Cooling Power | Weak airflow, takes long to cool | Strong breeze, rapid cooling |
| Smell | Musty, sour odor (mold) | Neutral, fresh scent |
What You’ll Notice After
Immediate Improvements:
- Rapid Cooling: The room reaches the set temperature much faster.
- Silence: No more rattling from an unbalanced fan or struggling motor.
- Fresh Air: The removal of mold eliminates the “sour socks” smell common in humid climates.
Long-Term Benefits:
- Lower TNB Bills: A clean unit draws significantly less power. Tenaga Nasional Berhad (TNB) estimates that regular servicing can improve energy efficiency by up to 15%.
- Extended Lifespan: Removing corrosive grime prevents gas leaks and motor failure.
Preparing for Chemical Overhaul
Before the technician arrives:
- Condo Access: If you live in a condominium, check if you need a management work permit for contractors.
- Clear the zone: Move beds, TVs, or cabinets away from the aircond wall to give the technician ladder space.
- Secure pets: The noise of drills and vacuums can startle cats and dogs.
During the service:
- Bathroom Access: Technicians will need a washing area (usually a bathroom or balcony) with a water tap to perform the chemical clean.
Frequently Asked Questions
Q: Will the chemicals damage my aircond? A: No, provided the correct chemicals are used. We use alkaline-based cleaners which are non-corrosive to copper and aluminum. We avoid acid-based cleaners unless absolutely necessary for industrial grime, as they can eat away the protective coil coating.
Q: How often should I do a chemical overhaul in Malaysia? A: For average usage (8 hours/night), an overhaul is recommended once a year. If you run the unit 24/7 (like in a server room or home office), consider doing it every 6 months.
Q: Does this service include the outdoor unit? A: Typically, a standard overhaul quote covers the indoor unit deep clean and a basic flush of the outdoor unit. If the outdoor unit requires dismantling and chemical cleaning, it is usually a separate add-on service.
Q: My aircond is leaking water. Will this fix it? A: Yes. 90% of leaks are caused by a jelly-like blockage in the drainage pan or pipe. A chemical overhaul completely clears this blockage.
What’s NOT Included
To manage your budget expectations, these items are usually charged separately:
- Major Repairs: Replacing a dead motherboard or noisy fan motor.
- Gas Top-Up: If the pump down was successful, you won’t need gas. If a leak is found, gas refills are charged per PSI or by weight.
- Spare Parts: Capacitors, thermistors, or remote controls.
Ready for a complete aircond restoration? Book your chemical overhaul - professional service with 30-day warranty.